

The best bagel recipe you will ever need complete with step-by-step instructions. These bagels have a delicious flavor and are perfectly dense and chewy with a lovely outer crust. Bagels, anyone? You got ’em.
Jump to Recipe
I have a son who asked me if he could have a bagel in his lunch every single day this year. He’s the same son that asked for a ham sandwich every day in his lunch for the previous 6 years so I’m thrilled he’s branching out into new territory. And I don’t blame him for choosing bagels. They are one of my favorite foods ever.
I got tired of buying Costco bagels so I decided this would be the year that I would figure out how to make delicious, perfect looking, and perfect tasting bagels.
I’ve lovingly dubbed this year: The year of the bagel.
Bagels are one of those recipes that eluded me for quite a while. I’ve made them for many years but they were always on the ugly side. Sometimes they tasted good, sometimes they didn’t. And I never could quite put my finger on what I did differently each time. I’ve experimented with at least a half dozen recipes. And I haven’t counted but I’m sure I’ve made hundreds of bagels. And no recipe was quite what I wanted. Really what I was looking for was THE BEST Bagel recipe. Like seriously the best.
Well my friends. Just as they say, necessity is the mother of invention. Since I never found the best bagel recipe I just had to create it.
And today after months of studious experimenting I give you THE BEST Bagel recipe. Ever. Complete with step-by-step instructions so you are assured complete success in your next bagel making venture. Which I really really hope for your sake is ASAP, if not today.
And oh my friends I am so excited about this post because these bagels are (dare I say it) every bit as good or better than the best bagels you’ve had.
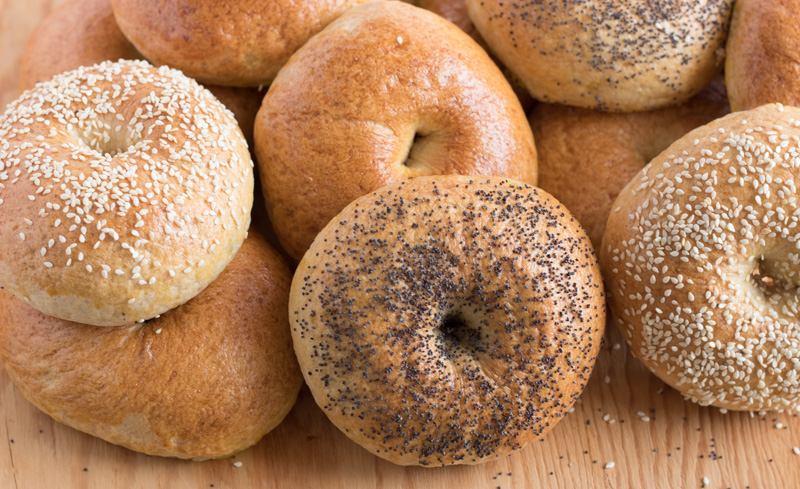
Perfectly dense and chewy with a lovely outer crust. The flavor is absolutely spot on. Especially if you happen to have some Parmesan or Asiago cheese lying around.
I’m pretty sure cheese bagels might be my absolute greatest weakness in life.
So what are we waiting for? Let’s dive into the instructions, shall we?
The best method to mix the dough
The first thing to consider if you are setting out to make the best bagels ever is the dough. The texture of the dough is super important. “The stickier the dough, the lighter the roll” is a true adage for rolls. But it doesn’t work so well for bagels. Since bagels are a free form dough (meaning they don’t have the sides of a pan or rolls touching them to help them rise upward), the dough needs to be just a bit stiffer and tackier than a roll dough.
Having said that, don’t get all crazy and make a super stiff dough or your bagels will start to resemble doorstops or hockey pucks more than bagels. And that’s definitely not what we are going for.
The best bagel dough is still soft enough to manipulate easily, but stiff enough to not leave much residue on your fingers after doing so. The perfect bagel dough is sticky enough that the yeast can easily stretch it when it rises but not so sticky that it doesn’t hold it’s beautiful bagel shape after being subjected to a water bath.
I’ve included in the recipe the exact weighted measurement of flour that I’ve used on multiple occasions to make these bagels. That amount will differ slightly depending on what kind of flour you use and the amount of gluten in it, but hopefully it will at least give you a good idea of a starting place. Make sure if you use the weighted flour amount you also weigh your water just to be sure it’s accurate too.
Can you just see me grinning in happiness as I weigh my water and flour for this recipe? Seriously it makes me so happy to have accurate recipes.
The first picture shows the bagel dough too sticky (before all the flour has been added). The second picture shows the bagel dough after enough flour has been added and as it is kneading for 6 minutes in the mixer to fully develop the gluten.

As a side note I love my bosch mixer and it’s great for making bagels. You can make them by hand, but it’s beyond the scope of this post to give those instructions (it’s already going to be long enough). If you have a question about making them by hand, ask it in the comments and I’ll try to do my best to answer.
Once the dough is ready, place it on a lightly greased counter and divide it into twelve 4-ounce pieces. I use my favorite bench scraper (aff. link) to divide the dough. Although it is optional, it should come as no surprise that after measuring my water and flour I also use a kitchen scale (aff. link).
Hey I like pretty bagels, okay? And what could be prettier than twelve, uniform, 4-ounce bagels sitting there staring at me in the face? I really can’t say.
How to form the bagels
The next step in making the best bagels ever is forming the dough.
Oh my. I have tried so many variations of this step in the many bagel recipes I’ve tried. And I’ve narrowed it down to the easiest, most efficient way to do things and still get yummy, beautiful results.
First take the bagel dough in your palm (like the first picture below). Cup your hand around the dough keeping the sides of your hand on the counter and roll the dough until it becomes smooth and round. Cover the dough balls with a thin dish towel (like these flour sack towels, aff. link) and let them rest 5 minutes. They won’t be noticeably risen after 5 minutes, but it gives the dough a chance to relax just slightly for the next step.

Taking the dough ball in your hand, gently push a hole through the center. Then gently use your fingers to stretch the hole just slightly until is around an inch wide. For best looking bagels work quickly and gently, not worrying about trying to shape a perfect bagel. The less you handle them at this stage, the better looking your bagels will be. Place the shaped bagels on two parchment-lined baking sheets (6 per sheet); the same ones you will bake them on. Cover bagels with a thin dish towel, and let them rise for 20 to 30 minutes.
While the bagels are rising, preheat the oven to 400 degrees F.
The water bath
The third step is the water bath.
Again there are so many different ideas about this step and I’ve tried so many of them. But this is by far my favorite (because it’s the easiest).
While the bagels are rising, bring 3-4 quarts of water and 4 tablespoons brown sugar to a boil in a wide-diameter pan over high heat. You can use a large pot or a deep straight-edge skillet. Then adjust the heat until it stays at a low boil.

Carefully transfer the bagels, three at a time, to the simmering water. As you put them in the water gently flip them so that the bottom (or ugly side) is facing up first. Increase the heat under the pan to bring the water back up to a gentle simmering boil, if necessary.
Cook the bagels for 30 seconds to 1 minute, flip them over using a wide slotted spatula (I really like this slotted spatula for making bagels, aff. link), and cook 30 seconds to 1 minute more. Using a wide slotted spatula, carefully remove the bagels from the water and place them back on the baking sheet.
After the bagels come out of the water bath they look a little bumpy and ugly. Hey you would too if you’d been through what they have! But don’t worry. As long as you carefully followed the steps thus far, they will rise and become beautifully rounded after baking in the oven.
The toppings & baking
You can keep the bagels plain or top them with any or all of your favorite yummy things.
For a dry topping, such as sesame or poppy seeds, whisk together 1 egg with 1 tablespoon water and brush each bagel with the mixture before topping heavily with seeds or spices.
If using Asiago or another cheese, there is no need to brush the bagels with an egg wash, simply place a generous amount of shredded cheese on the bagels.

The bagels bake one sheet at a time in a 400 degree oven for 20 to 25 minutes or until they are a lovely golden brown color.
Can I freeze these bagels?
Yes! Feel free to double the recipe so you have some to freeze. We do it all the time for an easy lunch or snack.
In fact, we had thawed bagels for dinner last night thanks to a super busy schedule (why hello there soccer season, is it you again?).
To freeze them in freezer bags, pack them in after they’ve cooled completely. They are best frozen the same day they are made.
Well that just about sums up the steps. Now get your aprons on and go bake some bagels. Don’t forget to save some for me. Cheese, please!

Update (5/21/2020): Since I posted this recipe, I’ve had quite a few questions about the texture of the dough, kneading it properly, and how to know if you have enough flour, etc. If you are new to breadmaking (or just looking to up your breadmaking game), I wrote up a super detailed guide to baking with yeast. In it I answer a lot of these basic bread making questions and more. Happy bagel making, my friends!
Update (2/15/2022): I’ve had some comments about a few people having trouble with the dough sticking to the parchment paper. I haven’t had that issue myself, but I added a suggestion to spray the parchment paper with cooking spray to help avoid sticking as an optional step. (7/8/2022): Some have said the type of parchment paper matters. Using a high quality parchment paper as another idea to prevent sticking.
2nd Update (2/15/2022): This recipe also makes 24 2-ounce mini bagels that are perfect for little kids lunches or parties (I made several dozen for a bridal shower once and they were amazing). Everything is the same except I make the centers a bit smaller (use just 1 finger to make them), you can fit 12 on a pan, and they will bake quicker (about 15-20 minutes in my oven).

The Best Bagels {Step-by-step}
The best bagel recipe you will ever need complete with step-by-step instructions. These bagels have a delicious flavor and are perfectly dense and chewy with a lovely outer crust.
Ingredients
Dough:
- 2 ¼ cups (18 ounces) water
- 1 tablespoon salt
- 3 tablespoons brown sugar
- 5 ½ – 6 cups (28.5 ounces) all-purpose flour see note
- 1 ½ tablespoons instant yeast see note
Water Bath:
- 2-3 quarts water
- 4 tablespoons brown sugar
Egg Wash & Toppings (Optional):
- 1 large egg
- 1 tablespoon water
- toppings: sesame seeds, poppy seeds, everything but the bagel seasoning, grated Asaigo or other cheese, cinnamon sugar, etc.
Instructions
-
Line two half-size baking sheets with parchment paper (spray the parchment with cooking spray to help avoid sticking, optional) and set aside. Heat water in the microwave on high for 1 to 2 minutes or on the stove until it is between 110 and 130 degrees F.
-
In a stand mixer add water, salt, 3 tablespoons brown sugar, about half of the flour, and the yeast on the top. Turn on mixer and add additional flour as needed to form a firm but still soft dough (see note). Dough should clear the sides and bottom of the bowl while it is mixing. It should be firmer than a roll or bread dough, but not so over floured that it becomes tough. Let mixer knead dough for 6 minutes to develop the gluten.
-
Divide dough into 12 pieces (about 4 ounces each) and roll each into a ball. Cover the dough balls and let rest for 5 minutes to relax the dough.
-
Once they have rested, one-by-one use your thumb to gently poke a hole in the center and carefully stretch the hole with your fingers until it is about an inch wide. For best looking bagels work quickly and gently, not worrying about trying to shape a perfect bagel. The less you handle them at this stage the better looking your bagels will be. Place the shaped bagels on the prepared baking sheets (6 per sheet). Cover them and let them rise for 20-30 minutes.
-
While bagels are rising preheat the oven to 400 degrees F. Heat 3-4 quarts of water in a wide-diameter pan with 4 tablespoons brown sugar to a boil, stirring to dissolve the brown sugar. You can use a large pot or a deep straight-edge skillet. Then adjust the heat until it stays at a low boil.
-
After bagels have risen, transfer them, three at a time, to the simmering water so that the bottom (or ugly side) is facing up. Increase the heat under the pan to bring the water back up to a gently simmering boil, if necessary. Cook the bagels for 30 seconds to 1 minute, flip them over using a wide slotted spatula, and cook 30 seconds to 1 minute more. Using a wide slotted spatula, carefully remove the bagels from the water and place them back on the baking sheet. Repeat with the remaining bagels.
-
Top the bagels with your desired ingredients or keep them plain. For a dry topping, such as sesame seeds or poppy seeds, whisk together 1 egg with 1 tablespoon water and brush each bagel with the mixture before topping heavily with seeds or spices. If using Asiago or another cheese, there is no need to brush the bagels with an egg wash, simply place the shredded cheese on the bagels.
-
Bake one sheet of bagels at a time for 20 to 25 minutes, or until they’re as deep brown as you like. Remove the bagels from the oven, and cool completely on a wire rack.
Recipe Notes
1. I have included the exact flour measurement that I use for this recipe – 28.5 ounces. That is for bagels made with 100% all-purpose flour. I have also made this recipe successfully with half white wheat flour. If you want to use an exact flour measurement for the bagels made with white wheat flour use 12 ounces white wheat flour and 15.5 ounces all-purpose flour. Note that this is 1 ounce less flour than bagels made with 100% all-purpose flour. This is because whole wheat flour is “thirstier” than white flour, meaning it absorbs more water.
2. I use the SAF brand of instant yeast that I buy in a large block and keep in the freezer in a sealed container.
3. I always boil all of the bagels at once, prepare them with their toppings, and then bake one sheet at a time. There is no harm to the bagels in letting them hang out on the baking sheets while the others are cooking.
4. INSTRUCTIONS FOR FREEZING: After baking, cool the bagels completely, then place in gallon freezer bags and freeze. They are best if frozen the same day they are made.
5. Update (5/21/2020): Since I posted this recipe, I’ve had quite a few questions about the texture of the dough, kneading it properly, and how to know if you have enough flour, etc. If you are new to breadmaking (or just looking to up your breadmaking game), I wrote up a super detailed guide to baking with yeast. In it I answer a lot of these basic bread making questions and more.
6. This recipe also makes 24 2-ounce mini bagels that are perfect for little kids lunches or parties (I made several dozen for a bridal shower once and they were amazing). Everything is the same except I make the centers a bit smaller (use just 1 finger to make them), you can fit 12 on a pan, and they will bake quicker (about 15-20 minutes in my oven).
Recipe Source: Heather @ The Cook’s Treat
All images and text ©The Cook’s Treat
Disclaimer: post contains affiliate links for items on Amazon.
Like this recipe? Here’s some more great bread recipes you can try:
- The Best Homemade Flour Tortilla Recipe – Just 5 ingredients, such an easy and tasty recipe. You won’t want to buy tortillas again.
- French Baguette Rolls – Seriously the perfect textured sandwich roll ever. Made in under an hour and so good.
- Quick Naan Bread – Soft and tender, this flat bread has such a delicious flavor. In this easy (under 1 hour recipe) you don’t even need to heat up the oven. We love naan.
- Easy French Baguettes – Learn how to make perfect French baguette loaves in under and hour. My family gobbles them up so fast I can never make enough of these.


These bagels look delicious and I can’t wait to try them! Quick question – is it possible to start these the night before and bake in the morning? If so, I wondered if you have recommendations about how that should be done? Thanks so much!
I have never tried it Erin but if I was going to try it I’d probably take them through to the water bath and then refrigerate them right after that (covering well so they don’t dry out). Let me know how it goes!
So proud of myself! Will be making these again. The bagles did stick slightly to silicone mat so will use parchment paper next time.
You will NEVER find store bought acceptable again once you make these at home!! You can play with adding different cheeses, everything bagel seasoning, plain , add different veggies like small fresh broccoli to your cream cheese to add. The flavor is so so good!!! My son begs me for these. One question though, has anyone figured out nutritional info such as calories for one of these amazing bagels if the recipe is followed to the T?
I followed your recipe exactly. they looked great until I boiled them. Then they went flat. They didn’t rise much baking. I bake breads all the time. I know the texture was right. I opened a brand new jar of yeast to make these. Any ideas??
Hi Rosa! Thanks for your comment. It’s hard to troubleshoot from a distance but I’ll do my best. My guess is they either needed a bit more flour or if the gluten wasn’t developed enough that would also cause them to flatten. So if you think the flour was enough (you want the texture to be fairly tacky —more so than a roll dough), then try mixing a bit more to develop the gluten. Hope that helps!
I used the little packets of instant yeast. To get to your measurements, I used two packages. Is that right?
The bagels tasted great, but were a little bit flat.
My husband and I LOVE this recipe! I’ve been making them for a couple of weeks now and freezing some so we always have them fresh. I do have a question! If I wanted to double the recipe, do I also double the yeast or just use the same amount of yeast but double everything else? I want to start making a bunch! Thank you!!
Thanks Olivia! There’s probably various opinions on this (technically I think you can use a little less yeast) but I err on the side of caution and always double the yeast when I double the recipe and it’s never done me wrong.
Very easy to follow. Can bread flour be used instead of all purpose?
Yes. Amounts may need to be adjusted since bread flour has more gluten in it
This is my go to recipe for bagels. The only tweak I’ve made to recipe is letting them rise for 60 minutes rather than the 20-30 minutes recommended. I like my bagels plump and giving them the extra time to rise gives me the perfect chubby bagel. They look just like bakery bought bagels. Great, easy recipe.
Thanks for this! I will try it Cammie!
I have a question! I’ve made these bagels a number of times (and they are a hit). But they always seem to have a tough outside. It’s not all together tough, the inside is amazingly soft. It’s gotten to the point where I only make these bagels before meal time, because they are soft right out of the oven but after about 30mins the outside is tough and hurts my teeth to bite. Any ideas? I’ve tried working with the flour ratio and it didn’t seem to help.
It may be the water bath is too long. Try shortening that up and see what you think! That’s what I found in the recipe testing anyway.
This is my new favorite bagel recipe! 🤗 I’ve started making half of the dough into a loaf of bread and using the other half to make bagels as it’s just me in my apartment and I don’t eat the bagels by themselves fast enough, but love to make sandwiches for lunch. I just true the recipe using half oat flour and half all purpose and it came out amazing! Lighter and fluffier than the original, but I did have to add a little bit of baking powder to make sure they rose enough with the oat flour. I will also be decreasing the salt slightly when I make them again with the oat flour as it came out a touch too salty, but they are still SOOOOOOO good!
Thanks Rachel! I love your variations
I made a batch of these bagels today and let me tell you… they are so good! I can’t believe I pulled this off! I’m sitting beside my kiddo who’s eating a plain one with strawberry cream cheese and she’s loving it.
Awesome! Glad you love it. 💗
I make these bagels often with great results just using measuring cups. Recently, I started adding chocolate chips to them. They are fantastic and a family favorite!
Today I made them but used a kitchen scale instead of measuring cups. They looked normal until I went to do the light boil for 30-60 seconds. They came out gooey and flat. I’m not sure what happened. Even baking them longer did not take the gooey patches away. Would you have any advice for this?
I will stick to using measuring cups from now on since I have the best results with that. I love this recipe.
Hmmm…you might need a bit more flour where you are at Makenzie! I agree —stick with what is working!!
First time making these and I made a few little mistakes. Was worried they wouldn’t turn out but they shockingly turned out amazing! I can’t even imagine how good they will be when I make them again (while following the instructions more diligently). Thank you for sharing!!
Thanks Haely!
Super delicious and perfect texture. These will be on repeat for sure !!!!!
So I’ve made these a bunch of times and they always turn out great. Have to make one batch to hide and freeze and the other batch disappears instantly. Anyways my question is have you ever done an overnight rise in the fridge prior to the boil and bake? Just for convenience sake? If so at what point do you think I would put the dough in the fridge, I was thinking prior to cutting and shaping but then I was thinking they may actually do better shaped first. LOL I am also thinking I will just have to do some bagel experiments!!
Hi Carli! No I’ve never done it that way! Let me know if you try it!
I just made these bagels and they turned out great! How do you defrost them? Do you put what you will eat in the morning in the fridge overnight, then on the counter when you wake up? If you use a microwave, how long do you defrost it in there? Mornings are a bit hectic with my one year old and want to make sure I have time to make my breakfast!
Hi Nicole. You can pull the out the night before to defrost them on the counter. I rarely remember to do this (full disclosure here lol). So I normally just defrost them for 15-20 seconds in the microwave and pop them in the toaster.
So I made this recipe two weeks ago. I’m not sure whether I put too much flour but all recommendations I found online for 28.5 oz amounted to 6 1/2 cups so it’s what I ended up using. This was also my first time hand kneading a dough since I don’t have a dough hook attachment. On that, I have to admit while the experience was interesting, I would not do it again, and I’m frankly not even sure my dough passed the window pane test. Either way, I spent a good 30 minutes or so on the kneading. I don’t own a bench scraper yet but a properly sharpened butcher knife worked just as well. Shaping them roundly, no matter how I tried, was remarkably difficult as the dough would crack, or at least open, when handled a bit roughly. It wasn’t such a big deal in the end though, especially after cooking them in the sugar bath.
I gave some of these to family members and pretty much everyone loved them. One person mentioned that with how thick they were, the yeast could probably have been omitted and they would still have turned out great. With how thick they were, it was quite difficult to maintain a whole of any size in the middle, so I ended up just widening the whole with the butt end of a knife after they came out of the oven.
We’re used to buying sesame seed bagels so I made most with those as a topping, with just four with the cheese topping. For cheese, I simply used shredded mozzarella. We didn’t have poppy seeds but I hear they’re good, so I want to try them next time!
One thing I would caution against however is microwaving water, as this can be dangerous and you could end up burning yourself. Much safer to simply use a stove or even a boiling kettle.
It does sound to me from your description that there was too much flour. Which explains why it was difficult to knead and develop the gluten. And probably led to raising issues as well. But that’s all part of the process! 😁 sounds like they were enjoyed anyway. Practice makes perfect!
If I may offer a tip, giving exact measurements for an ingredient that’s as tricky as flour in baked goods is better than offering a window of approximations, especially for people who are not as used as you are to baking breads.
In this case, your window of 5 1/2 to 6 cups would lead one to believe that an even 6 cups is the maximum amount one should use for this recipe. However, as I found this very confusing, I looked up the exact ounce measurements in your note and found that 28.5 oz of flour is actually around 6 1/2 cups.
I would strongly recommend editing this recipe with more precise measurements.
Thanks for the tip Cynthia! I actually use 5 oz per measured cup for my flour measurements so that is accurate with the recipe. Sorry it was confusing to you though!
If I’m understanding you correctly, doing the math this is basically around 5 cups and 3/4 of a cup. Might be easier for others to understand and lead to less confusion if you write it that way. 🙂
Flour in bread is not an exact measurement because there are adjustments needed depending on altitude etc.
Also the amount of flour you need depends on location and if you are high or low altitude weather will also affect it etc…I’ve done recipes where I have used over a cup more than the recipe states so just depends you have to play around with things sometimes however the recipe is very simple and easy to follow you just have to adjust what works for you regarding the above. So where the author this is the average on what works for her that’s why she stated the amounts she did, but definitely have Tom play around with it and it also depends if your using wheat, AP, bread flour etc…also the quality of flour makes a difference hope that’s helps next time good luck!
Also the amount of flour you need depends on location and if you are high or low altitude weather will also affect it etc…I’ve done recipes where I have used over a cup more than the recipe states so just depends you have to play around with things sometimes however the recipe is very simple and easy to follow you just have to adjust what works for you regarding the above. So where the author this is the average on what works for her that’s why she stated the amounts she did, but definitely have Tom play around with it and it also depends if your using wheat, AP, bread flour etc…also the quality of flour makes a difference hope that’s helps next time good luck! Also depends as I’ve found out on what other ingredients you put into them if your putting wetter toppings etc….
The amount of flour you need depends on location and if you are high or low altitude weather will also affect it etc…I’ve done recipes where I have used over a cup more than the recipe states so just depends you have to play around with things sometimes however the recipe is very simple and easy to follow you just have to adjust what works for you regarding the above. So where the author this is the average on what works for her that’s why she stated the amounts she did, but definitely have Tom play around with it and it also depends if your using wheat, AP, bread flour etc…also the quality of flour makes a difference hope that’s helps next time good luck! Also depends as I’ve found out on what other ingredients you put into them if your putting wetter toppings etc….
When you say freeze the bagels, how do you defrost or reheat from frozen?
Hi Jodi, good question. I usually just let them defrost at room temp. But a few seconds in the microwave will also work in a pinch. 😀
A trick I read to stop sticking bagels is to use corn meal on the parchment paper before the dough goes on top. It will prevent them from sticking to the paper. Hope this helps.
Great idea Angie!
A trick I read for sticking bagels is to use corn meal on the parchment paper before the dough goes on top for it to rise. It will prevent them from sticking to the paper. Hope this helps.
Do you think I can do the mixing and rising of this recipe in a bread machine?
Hi Betty, I’m not familiar enough with bread machines to know—I’ve actually never used one. But if that’s what you have I think it’s definitely worth a try. You would probably want to check specifically on the flour capacity of the machine to make sure the amount from the recipe was less than that before you try it.
Thank you so much for this recipe!! First time making bagels and I was so happy to see them actually look like bagels (I guess I didn’t know what to expect with my skills haha). I love that you have pictures for beginners like me – they helped so much!! I’m not usually great with dough….so I am super happy. I haven’t tried them yet but I’m sure they will taste awesome too!
Glad you liked the recipe Carly! Thanks for taking time to comment and rate the recipe! 🙂
I’ve always been intimidated by making bagels but these came out SO good honestly. Thanks for the great instructions!
So glad they worked well for you Sarah! Thank you!
Hi Heather, its my first attempt at making bagels. I used your recipe and they came out amazing. My husband said don’t ever change that recipe. My question though is what can I use to replace egg wash to put on the topping of sesame seeds or any other topping?
Thanks Nyla. I’m glad you liked the recipe. If I was avoiding the egg wash I would either brush a little oil on top to stick the toppings on or just stick them on as soon as I removed the bagels from the water bath when they were still kind of wet so it would stick. I hope that helps!
Amazing recipe – I didn’t have a mixer with me – used my hands and I’m loving them – thank you
That is good to know the recipe worked by hand Jan! Thank you.
This was my second attempt at making bagels, first time using your recipe. I baked some without boiling and done both ways came out very well.
Thanks Ron. That’s good to know about the boiling. What was the difference between the bagels? My guess is texture. I actually have never tried not boiling them (I have tested boiling them for different lengths of time).
I just found this recipe and have not tried it yet. Looking forward to it.
I have a question regarding water in the recipe and water bath.
The water in Florida is different and a relative moved there and said bagels in FL is not so good and she was told it was due to the water.
I will be going to FL also and am considering trying to use bottled water for the water bath and in the recipe also and would like your feedback if I might be successful using bottled water?
I might try to make this 2 times and try NY filtered water and then try bottled water and see if I get similar results. Thanks
Hi Barb,
I am completely unfamiliar with the difference with the water in Florida, sorry. My guess is bottled water should work? But I don’t know for sure. Please fill me in when you find out! Thanks for your comment.
Hi Barb – I winter in FL and have made delicious bagels here. While different water will have an effect on the taste (NY swears by their water for the best bagels), I don’t believe you can’t make good ones. Using bottled water seems like an expensive option, but if that’s what works for you – go for it! Happy bageling. 😉
Thanks for chiming in with this Lisa!
This recipe is absolutely perfect. My first attempt at bagels and they came out perfectly! One question.. If I don’t want to freeze them, how do you recommend storing them? (Just for a day or two)
Glad you liked the bagels and good question Tracy. Since there are no preservatives (like in the wrapped bagels from the store) they definitely don’t last as well at room temperature. I always freeze mine because they taste just like fresh when they thaw. But if you don’t want to freeze them they will still be good the next day (just not AS good). It will be similar to the difference between fresh and day old bagels from a bakery. I would just store them in an air tight bag. Hope that helps! ☺️
I made these and loved them! They look wrinkly but I did see you mention that I may need more flour or they over proofed. I’ll try using 6c of flour next time. Your ingredients and instructions were easy to follow. Thanks for sharing!!
Thanks for the review Sarah. I’m glad you like them. Yes it sounds like they maybe just needed a bit more flour. They have a tackier feel than a normal bread dough. Hope that helps. Let me know how batch #2 goes!
Absolutely love this recipe !
I have made it 4x so far (and on my first try I made a batch of 120 bagels) and they have been delicious every time!
I just recently tried it with all purpose whole wheat flour and they were awesome! I didn’t change any ratios but I did do a half batch only since it was a test 😉 They mostly expand during the “water bath” rather than during the rest period compared to the white flour bagels.
I used chia seeds, sesame seeds and cheese for toppings and they were so good !
Thanks for this great recipe 🙂
After one bite, my husband said….we are never buying bagels again.
So delicious!!
Our oven is broken and we are waiting on a part. In the meantime, we have been making everything on our Traeger pellet smoker. These baked up delicious on there.
Excellent recipe. Followed it exactly. It did take almost 10 minutes with the dough hook to develop the gluten. I use the windowpane test to check gluten development.
“We are never buying bagels again” Love it. I agree Janelle it ruins you for any other bagels. Lol. So good to know it works great on the Traeger. I’m curious what kind of mixer you made them in. My full sized Bosch has the dough ready in just 6 minutes but I’m glad you did the windowpane test to check with yours! 🙂
Hola!! Me ha despertado la necesidad de hacer estos Bagels, ha sido un desafio para mi y en verdad me transmitiste el deseo de lanzarme. Pero tengo una duda, cuando haglas de calentar el agua en el micro, esta agua es para la receta de la masa??
Mi Gracias!!
Fanny desde Republica Dominicana.
Hi fanny, thanks to Google translate I think I figured out what you are asking (correct me if I’m wrong):
“Hello!! The need to make these Bagels has awakened in me, it has been a challenge for me and you really gave me the desire to launch myself. But I have a question, when you heat the water in the micro, is this water for the dough recipe?
My Thanks!!”
Yes the water in the microwave is the water you will use in the dough recipe. You want the water hotter than you would get from the tap. You can also heat the water on the stove until it reaches the desired temperature if that works better for you. I hope you enjoy the bagels!
For safety purposes, I would strongly recommend that you avoid heating water in the microwave as you can end up burning yourself. Instead, please use a boiling kettle or even just your stove to boil it.
Hi Cynthia, I’ve heard this before and never had an issue but of course always go with your gut on this!
AWESOME BAGELS!! did a different, longer rising recipe last week…doesnt compare to yours!!
These are great!!! Thank you!!
Thank you for your feedback Heather! So glad you loved the recipe.
This recipe is by far the best explained with pictures to accommodate beginners. At any rate, I am a chef/baker, and although I have the experience I have found bagels challenging. Hurray, Eureka I did it because of your recipe! Great flavor, and texture, and my husband loves them. Thank you so very much Heather for sharing and teaching us, you are amazing. P.S. The only problem I had was the bagels adhered to the parchment paper and as I was trying to get them off for the water bath they fell, I think I will brush the parchment paper with EVOO next time.
God Bless, and thank you again-Tamitra-N.H.
Thank you Tamitra. Although I’ve made literally hundreds of bagels I’ve never had the problem of them sticking to the parchment paper, but others have complained about it as well. Let me know if the oil works for you next time.
I think it really depends on the quality of parchment paper used. When making pretzels, I had that problem with cheaper parchment paper. Tried a batch with Reynolds and those didn’t stick. Have you ever tried using a silicon mat?
Thank you Glenna! I hadn’t thought of that, but it totally makes sense. I usually get those pre-cut parchment paper sheets from Amazon that I can throw away when I’m done. I do a lot of baking (as you can imagine) so it works for me. They probably are a bit higher quality than the grocery store parchment. I have also used the parchment rolls from Costco and I know that those work well. I have never tried a silicon mat. Let me know if you try it. I’d love to hear how it works for you. Thanks again for chiming in!
I think, personally and from baking bagels/rolls quite often, don’t use oil or butter on the pan. The longer baking time at a higher temp will cause the bottom to over-brown and sometimes slightly burn. Use parchment or a silicone mat, but sprinkle a bit of coarse corn meal/polenta or coarse ground rice flour under where each bagel will be placed. This creates an “air gap” and helps keep the baked goods from sticking. Just a bit of either of these works great and can generally be brushed off if the texture isn’t to one’s liking.
I want to try this recipe but can I use spelt in place of the AP flour? Have you experimented with Einkorn?
Hi Shay, yes you can use spelt in this recipe. If you use more than half whole-grain flour it will start to dry out the texture so I would add in around 1/3 cup of gluten flour if I was going for whole grain spelt bagels. I have not experimented with Einkorn yet but have plans to soon. Let me know how it goes. 😊
First time making bagels! Your amazing step by step directions were great and they came out perfect!! Topped with Everything Bagel topping! Hard to wait until they are cooled…but they taste great warm as well! Thank you so much!
Hey Susie! I made bagels today too!! Glad yours turned out. Love the Everything Bagel Topping. Yum! 🙂
Delicious bagels! I usually shy away from yeast recipes due to little success in end result. However, these came out amazing. I followed recipe to the letter. Dough was a bit sticky but after a few additions of flour it was great. I experimented with the following toppings: sesame seed, rosemary, parmesan, and cinnamon sugar. The recipe details really helped in successful yummy bagels. So good!! This is a keeper for sure!!
Thank you Patty! Glad the recipe worked well for you.
Hi! I have tried several bagel recipes with reasonable results. I was going to try yours but noticed that it doesn’t call for two usual risings, not to mention a slow overnight rise. 20-30 min and that’s it? Hmmm…
Hi Dusan, yes that’s correct. It is a quick rise bread recipe. If you want to learn more about the method I use you can read the post here: https://thecookstreat.com/guide-to-baking-with-yeast-includes-faqs-my-quick-rise-bread-method/
You will need a mixer for these bagels. Hope that helps! 😊
Got it. Thanks!
These bagels are great! I had to add a bit more flour to get the consistency you described but they were wonderful. I put everything bagel seasoning on them. Thanks for the great recipe.
Hi Tanya, You are welcome. I’m so glad you added the flour to get the right consistency. I love the everything bagel seasoning too! Enjoy!
Was wondering if I could use bread flour instead of AP flour?
Thanks so much
Yes that should work Michelle. Just keep an eye on the consistency of the dough (always a good idea with bread recipes) rather than going by the recipe measurements and it should work great.
Great recipe and tips. They turned out wonderful. Thank you@
Thank you Jan! Glad they turned out well.
Awesome recipe. Made some last weekend and they’re gone already. So more are rising right now. Want to try adding raisins toward the end of kneading. How much cinnamon would you add and would I add it at the time I add the raisins? There’s nothing better in the morning than a toasted and buttered homemade bagel with a cup of tea.
Glad you liked the recipe Terry. I’ve never made cinnamon raisin version of these. But if I was experimenting I would add 2 tablespoons of cinnamon with the dry ingredients and let it knead with the dough. Then at the end I would toss in about 1 cup of raisins until mixed in. Let me know if you try it, what you think.
yeah, made this, such an easy recipe, but when the bagels rested for 20-30min they stuck to the parchment paper, were totally destroyed when I tried to take them off, what a total failure and mess. this was my 4th attempt at bagels. I am beaten!!!!!
Cheryl, I have sprayed the parchment with a little oil and spread with a paper towel. Sometime I toss some cornmeal on the greased parchment too. That usually keeps them from sticking. Then, I cut the parchment around the bagels so I can remove them without handling them and turn them into the boiling water. Might be worth a try.
Thanks for the comment Cheryl and your input Teri. You could definitely try the oil or cornmeal on the parchment. I expect if they are sticking at that stage you may not have enough flour in the dough. Remember you want the dough tackier than a bread dough but not stiff. You have to go by the feel of the dough and not by my measured amounts because the amount of flour needed depends on your own environment. Hope that helps! Don’t give up. 😊
OMG look at my bagels. So excited, thanks to all that gave me advise.
Yay! I’m so glad you did it Cheryl! 😊👍
Hey, this was my first time making bagels and I loved this recipe. They turned out great.
Thanks Jessica!
Just made these beauties, my first attempt at bagels and so impressed with this recipe. Had to change the measurements over to metric but worked a treat.
Thank you.
I loved reading about your success Warren! Thank you.
Hey… What rack should i bake the bagel?
Hi Marvella I usually bake mine on the center rack. 😊
Awesome baguels, make somme white cheese and flaxseed
Thanks Sabine! Your flavors sound yummy.
Loved this recipe!
Thanks Sasha!
Easy to make. My first attempt and they were fabulous! Thanks for the great recipe
Thanks Gina!
These are so amazing! I’ve been wanting to make bagels for a long time but lately I’ve had terrible luck with baking and have been scared to try bagels. However, these turned out amazing! The detailed directions definitely helped. Three devoured bagels later and baby and I definitely approve (and I’m sure the hubby will too after work)! Thank you!
Thank you for your comment. So glad you liked them. We are huge fans too. 🙂
Hi! I’m thinking of making these as egg bagels. Any tips on converting the recipe? Thanks!
Hi Ali, I’ve never tried egg bagels. Sorry! Let me know how it goes and good luck.
I’ve made these a few times now and they are definitely delicious. I get a great rise using instant yeast. The problem I’m having is transferring them to the water – once I handle them they deflate. I added oil to the silpat where they do the long rise and tried scooping them up delicately with a fish spatula but they still just flatten. I’m at a loss – I would love to have puffy non-wrinkly bagels. Again, they are delicious but they are flat and ugly. Any ideas are appreciated!
Hi Darcy! I’ve got a few ideas. My first guess is that you may not have enough flour. The extra flour helps them be a little more sturdy so they don’t deflate when you handle them at that point. You don’t want too much flour but I do may the dough a little stiffer than say a bread or roll dough. If you think you’ve got enough flour then the next thing is that it could be the bagels are actually over proofed meaning they’ve risen too much. I would make sure you don’t let them raise too much or they have a tendency to deflate. Hope that helps!
Dear Heather
Thank You for the recipe I will try this weekend I usually do Cakes but with the pandemic I start doing all the bread that we need at home; so I have some questions.
I live in Honduras so our Honduran Flours are a little differents than USA flours, for example we have one that we use for bread that has 4g of protein that works as all pourpose flour. Do you think that can be ok for the Bagels?
Can substitute sugar for honey in the dough?
And I use SAF Instant yeast like you😊 and I am worried to keep in the freezer.. how do you keep in the freezer and how it help after you opening.
Thank you so much Heathet God Bless you.
Hi Carol . Yes try the flour you use for all-purpose or bread for these bagels. You can use the same amt of honey as sugar in the dough. I keep my SAF yeast in a quart jar with a twist lid in the freezer. It lasts a lot longer that way. Good luck! Let me know how it goes.
If I may make a suggestion. I let the bagels raise on greased parchment, and then cut the parchment apart and handle it by the parchment. I flip it upside down in the water with the parchment still attached and slip it off. Works great and then I don’t mangle my bagels.
Thanks for the suggestion Teri! That sounds like a great way to do it.
You’re welcome!!
Delicious! They came out perfectly-I did have to add about and extra 1/2 cup of flour to get the dough to the right consistency but I’m an experienced bread baker so not a problem. I was a little worried that a full tbsp of salt would make the bagels too salty but they tasted perfect! Thanks for the great recipe
Awesome! Thanks Stephanie. 😊
I’ve been making your bagel recipe nearly every weekend since this while pandemic started. Sometime I would just make a single batch and sometime I would double it up! My family and I are a HUGE fan. I’ve made cheddar bagels and sesame/ poppy seed bagels. But lately I’ve been wanting to try something a bit more dangerous. So today I made blueberry bagels using your recipe. I started your recipe just like always and only added the blueberries at about a minute left of kneading. In goes the blueberries and I instantly have a much more gooey dough. So what do you do your dough is too sticky…you add more flour. I was so convinced that they weren’t going to turn out. I added enough flour so I had the right consistency and long and behold, I was able to make a bakers dozen! And they actually turned out great!!
Hi Nicole, those blueberry bagels sound so good! So glad you are enjoying the recipe. 🙂
Can a knead by hand ??? If so, how long do I have to knead the dough???
Hi Janeth. I went into great detail about the things to consider when making one of my bread recipes by hand in this post, hope that’s helpful to answer your question: https://thecookstreat.com/guide-to-baking-with-yeast-includes-faqs-my-quick-rise-bread-method/
I made these today. Huge hit. I filled them with red pepper cream cheese. Top with everything bagel seasoning. Perfect brunch recipe.
Those sound amazing Krystal! yum 🙂
Just tried these….worked perfect! Thanks for the detailed instructions. I will make these again!
So glad the recipe worked perfectly for you! Thanks Melissa.
Hi … I’m planning to make these by hand. Please guide. Thanks Arlinda
Hi Arlinda,
I’ve never made them by hand by here’s what I would do different if I was going to try it:
Use warm water instead of hot.
Knead the dough by hand for about 12 minutes after adding the flour.
Let them rise once in the bowl before you make the dough balls.
Follow the remaining steps as written.
Hope that helps! Good luck.
Help! Can someone tell me how much fresh yeast to use in this recipe instead of the 1.5 TableSpoons of dry yeast? My brain hurts and I’ve tried a million websites to convert!
Hey Raquel, I’ve never used fresh yeast but this is what I found online: “Because fresh yeast has moisture in it, you should use 3 times the fresh yeast in weight for the same rising ability of instant yeast.” Following those guidelines I would use 4 1/2 tablespoons fresh yeast for this recipe. Hope that helps. 🙂
Hi I tried this recipe and the bagels look amazing. I just finished baking them but bagels have stuck on to the parchment paper. Do you know why? And how I can avoid it the next time? And what I can do about it now?
Hey Afra,
A few other people have mentioned this same issue and I think I would try spraying the parchment paper next time and make sure you have enough flour in your dough. Also if you egg wash them too much it may be the egg causing them to stick too. Hope that helps! 🙂
These came out so good. I put sharp cheddar cheese on some before baking and they came out so tasty!
Hey Sara glad you liked the recipe. Sharp cheddar cheese sounds yum!
I followed the recipe exactly, weighing the flour and water as well. I ended up needing to add flour due to stickiness. They turned out fairly well, however looking a little flat after removing them from the oven. Any suggestions? I haven’t tried them yet as they just finished but they smell delicious! I will definitely keep trying this recipe to get it just right as it was very easy to follow and the directions were very clear.
Thanks for letting me know Kristin. The weighted amounts is just to help you ball park the amt of flour not as an exact amount so I’m glad you added more if you thought they needed it. It could be several things if they were flat— the yeast, not enough flour, over raising the dough etc. my guess is if they raised well and then flattened it’s either not enough flour or too much time raising before the water bath.
I was just about to give up on making bagels when I came across your recipe. My son said it is better than what we could buy at the store! I love your step-by-step instructions/descriptions! I do love raisin bagels, so I took half of the dough and mixed in softened rasins and cinnamon. They turned out perfectly! I can’t wait to make them again. I may try Orange/Cranberry next! Thank you again!
Thanks so much Janet! I am so glad. And your flavor combos sound delicious. 😊
They turned out delicious, but how do you get them to not stick to the parchment paper? They stuck a little before the bath and then really stuck after baking them. Did I not add enough flour?
Hey Shawn, you could try spraying the parchment with non stick cooking spray. My guess it is a flour issue though. I would try making the dough a little tackier next time and see if that helps.
Everything went perfect, they rose well looked great until I put them in the water bath they they went flat. Any suggestions on why? Taste is great and family loved them anyway. Can’t wait to try again. Cyndi
Hi Cyndi, two things I can think of. Sometimes that happens if you let them raise too much. The other thing it could be is not enough flour to help them hold their shape. I did experience that in my recipe testing and usually for me it was not enough flour. Hope that helps!
Nice looking recipe and tutorial! Wondering if you brush the egg wash on the bagels if you just want them plain?
Hi Amy, it’s up to you. You don’t need to. The egg wash wash just gives them a nice glossy finished look and helps the toppings stick better.
I just made these but it seems like 400 deg might be a little too hot because it seems like they were a little browner than a normal bagel ( and the ones in your pix 😉). They almost seem more like pretzels, do you have any advice?
Hi Lauren your oven may cook hotter than mine so try turning down the temperature by 25 degrees 😊
Loved how you walked us through step by step! Quick question, I used Red Star fresh yeast and it didn’t seem like the bagels raised very much, this was my first time using fresh yeast too, is this normal? I let them rest for 30 minutes and it concerned me but they turned out awesome!
This was the first and last bagel recipe I ever tried. It is exceptional, easy, fast, delicious! The title is perfect! Thank you, thank you so much for this article!
Thank you Anik! 🙂
First try making bagels and my family has already eaten most of them. Mine were a bit lumpy, not smooth. Should I have mixed them longer? (didn’t seem to bother the resident food critics though!)
Hi Susan. Your description of the resident food critics made me laugh! 🙂 I can totally relate. Haha. It could be the mixing step yes or maybe you didn’t have enough flour. After making hundreds of ugly bagels (and yes we ate all the ugly ones), I realized that if I used just a bit more flour than I normally do for bread recipes that they turned out pretty and smooth and held up better in the water bath step. You don’t want too much flour but the dough is firmer than it would be for a normal bread dough. Hope that helps.
OMG! These are so good! I added cinnamon and raisins to some. Amazing!
Thanks Leslie! Love the cinnamon/raisin idea. 🙂
How everything that went so wrong would produce a delicious, albeit ugly, bagel is amazing. I’m not sure why but used almost a full cup of flour than the recipe called for and the dough was still super sticky making every step to follow quite difficult. The end result was my bagels super-glued to the parchment paper. Bagel tops were delicious though!
Hi Maria sorry you had so much trouble. Did you weigh the flour and water? and did you use a mixer to knead them or knead them by hand? That surprises me that you needed that much extra flour and the dough was still too sticky. The only thing I can think was it probably needed more flour. Glad you were able to enjoy the tops though 🙂
Hi all purpose flour? Is that plain flour or bread flour?
Hi Jude, plain flour is what I use but I think some other commenters were going to try bread flour. Let me know if you do. 🙂
So yummy!!! I used active dry yeast and mixed by hand. They came out perfect. So easy and delicious!!
Hey Holly thanks for letting me know. So glad to hear they worked well mixing by hand with active dry yeast. 🙂
I’ve made this recipe twice and both times used active dry yeast instead. It seems you just have to let the mixer knead them a little longer to develop the gluten! My family no longer likes store bought bagels! These are fantastic!
Good to know Richelle. I’m glad you liked the recipe!
I forgot to add the brown sugar to the water this time. Ugh. I hope they turn out. So far looks like they may not be browning as much?
Hope they still were good Richelle!
Hello! I’m wondering if I have to make the bagel with the hole in the middle. I prefer my bagels with little to no hole because I like to use them as bread for sandwiches. Will that change the cooking at all?
Hi Davida, that’s a great question . I’ve never tried it without a hole but there’s been plenty of times I’ve inadvertently made the hole not big enough so it fills in and it works just fine that way. So you could try just making a hole in the center but don’t stretch it much and it will fill right in. Or If you try it with no hole I’d love to hear what you find out. I’m guessing they will bake up great that way too. Good luck! 😊
I used active dry yeast and didn’t have any issues with the rise. I warmed the water to about 115F (no warmer) and dissolved the yeast in the water, let it sit for a minute or two, and then added that to the mixer rather than putting the yeast in dry. Mine rose nicely in pretty much the same time as stated in the recipe. The big issue I had was they all stuck to the parchment. I think I should have moved them to clean dry parchment after boiling and egg washing them and right before baking or maybe baked them on cornmeal or something. Flavor is really good, but I need to work on my bake.
Thanks for letting me know John! That sounds like a great technique for using active dry yeast. I’ve never had problems with the bagels sticking to the parchment paper like that. I use a slotted spatula that drips most of the water off before It goes back on the parchment. I can see how if it gets really soaked you might have a problem. It could be the egg wash too. If you’re a heavier egg washer than me. I just lightly do the tops and I have leftover egg wash when I’m done. Hope that helps! Thanks for your comment.
That happened to me pretzels sticking to the parchment after boiling. I think it has to do with the quality of the parchment. My daughter-in-law used Reynolds brand and it didn’t stick. Also you could try spraying the parchment with nonstick spray or use a silicon mat. Hope this helps.
Thanks for chiming in with your experience Glenna!
Something is not working and i don’t know what it is. The bagels barely rise, and my yeast works because I made bread and pizza with it without any issues. Then are they supposed to sit on top of the water? I’m confused because mine sink … help lol
Hey Kris, you’ve stumped me. The only thing I can think of would be the yeast. Do you know what kind of yeast you are using? Is it instant or active dry? This recipe is written as a quick rise recipe and uses instant yeast (many recipes call for active dry yeast which rises a lot slower). Could that be it? It will still work but you will have to let them rise a lot longer and maybe change the method some (they may need two rises?). I’m not as familiar with active dry yeast other than I know it acts quite a bit different. And yes when you do the water bath the bagels should kind bob a little and then float on top of the water. Hope that helps!
THANK YOU!!! We made these yesterday and they turned out amazing!! xoxo
Thanks for letting me know Stephanie! I’m so glad they turned out! 😊
Help. My kids want fresh bagles , but we’re down to less than 3 cups of flour. Can I decrease the recipe by half?
Hey Melissa, It takes just barely less than 3 cups for half a recipe so you’ll be really close. If the texture is not quite firm enough with the flour you have, you could make some oat flour by blending some rolled or quick oats in a blender to add to it. The problem is the oat flour is doesn’t have gluten so I wouldn’t use a ton of it, but if I needed just a little bit, I would probably try that.
One more issue with halving the recipe is that that small of an amount of dough sometimes doesn’t mix properly with a mixer. You can always knead the dough by hand but I would probably give it an additional rise time to double to help develop the gluten before forming the balls for the bagels. Hope that makes sense.
These bagels are unbelievably good! So much better than any bagel I’ve ever purchased, even from specialty bagel shops. So easy too! I’ve made 2 batches in the past few days.
We’ve made cheddar, jalapeño cheddar, everything, and plain. I’ve also experimented with a half whole wheat batch and it came out great. Planning on trying more flavours like chocolate chip, onion, cinnamon sugar, and blueberry.
I’m stocking my freezer with them since we are stuck at home for who knows how long. I make 12, we each eat one in the morning, and I add the remaining 8 to my freezer stash.
Thank you so much for this recipe. My family is in love!
Wow Melanie I love your flavor ideas. Thanks for sharing and I’m so glad the recipe is working great for you. I agree it’s really easy once you get the hang of it. And what a great thing to stock your freezer with!
Mine turned out flat as a pancake. Followed the recipe step by step and we are now 2 hrs into “rising” and they aren’t close to being a bagel. Just dough.
Hey Hollie, sorry they didn’t work out. It sounds like it may be a yeast issue. What kind of yeast did you use? This recipe calls for instant yeast so make sure that’s what you are using. If it is instant, have you used it recently to see if it’s still good? To test it, add 1/2 cup warm (110 – 115 F) tap water into a cup. Then stir in 1 tsp. sugar and 2 tsp. yeast. Check the yeast after 10 minutes. If foam and bubbles have formed, then the yeast is still alive and active. The mixture will be approximately half milky looking water and half foam. Hope that helps. Let me know how it goes.
I am nowhere near a baker. I followed this step by step and they are great. I had to add more flour to get it the non-sticky consistency recommended and I didn’t make the holes big enough. Other than that, they turned out amazing! Thank you so much.
Glad they turned out Rachelle. Thanks for letting me know. 🙂
I’ll start this by saying, I am the furthest thing from a baker. I make christmas cookies once a year, and that’s about it. I’m locked inside for the foreseeable future, our grocery stores are wiped out, and I wanted a bagel. I stumbled upon this recipe and figured, worst case scenario they don’t turn out, best case scenario- i have bagels! I halved the recipe, followed it step by step, and these babies came out absolutely perfect. I will make these again and again, they are fantastic. The recipe was so well written and easy to follow. I can’t say enough good things about these! I may never eat another store bought bagel in my life.
Hey Sam I’m so glad the recipe worked for you. We love these bagels too and I agree they are better than the stores. It may be slightly dangerous to be locked inside with these bagels, just saying! Haha. Thanks for the feedback.
Love this recipe, but I only “boiled” mine for 30 seconds on each side & they were chewy on outside & like a bread roll on the inside. Should I boil them longer? Also, they stuck to the parchment. Should I spray it?
Hi Brenda, I’m glad you love the recipe. Yes I would say you probably could go with a few more seconds in the water bath to help with the texture. And spraying the parchment will help with the sticking for sure. I’ve never had that problem with mine but it could be the kind of parchment you were using maybe? Good luck!
can i substitute with bread flour and would the amoutn be equal to ap flour?
Hi Esther, that is a really good question. Yes bread flour should work, but I’m not sure on the exact amount to tell you. I’m guessing the amount would be slightly less because bread flour has more gluten than all-purpose flour. Also the texture may be slightly different, but I’m sure they would be really tasty. If it was me, I’d start with maybe a cup less flour and add it until I got the consistency the recipe describes. Good luck!
Hi Heather!
Trying to make your recipe, but I just weighted my six cups of flour and the total is 33,4 oz instead of 28,5 Oz so I have all this extra flour that I’m guessing I have to not add it.
I’ ll be back eith the result.
Hi Alejandra, yes just start with the weighted amount in the recipe. Then you may need to add a little more or less flour depending on your humidity, etc. Just make sure your dough is tacky but not stiff. Good luck!
This is the best recipe for bagels !!!!!! They are DELICIOUS!! I just want to know how to make the cinnamon-raisin ones!
Hey Silvana— I agree these are the best! I’ve never made Cinnamon raisin but I’ve made cinnamon chip! Just throw in a handful or two of cinnamon chips and I’m guessing you could add the raisins the same way. The cinnamon chip ones are amazing too! Let me know if you try it.
These turned out great on the first try! Great recipe! I used all 6 cups of the flour and got a great tasting bagel. I left a few plain and topped the others with cheese or everything spices!
Thanks for the comment Katey! Glad you enjoyed the recipe.
Hi!! Just put these beauties in the oven, I made most with an onion and garlic topping, I’ll let ya know how they taste, I’m sure they will be Fantastic. Thanks for a wonderful recipe.
Omg!!! They are great!!just out of the oven. Next site is Weight Watchers LOL. Thanks again.
Lol Sarah! Glad you loved them. Thanks for leaving a review. 😊
Loved how you walked us through step by step! Quick question, I used Red Star fresh yeast and it didn’t seem like the bagels raised very much, this was my first time using fresh yeast too, is this normal? I let them rest for 30 minutes and it concerned me but they turned out awesome!
Hi Melissa—I’m so glad you liked them. I have never used red star fresh yeast so I have no idea how quick it rises. I always use instant yeast (saf brand) so that’s how the recipe is written. Mine do rise pretty significantly in the 30 minutes so you may want to experiment and see they benefit from a longer rise time. Also I don’t know if the prep is different? With instant yeast you can just add it directly to the mixer with everything else. It probably says on the package if it needs proofing before using it. Hope that helps. So glad they still turned out good! 😊
Okay, now we ate two of these delicious bagels and they truly are the best we have had since we left New York.
Woo, nice steps to make bagel. Really want this steps for improve my baking.
Thanks Joycelyn! Good luck with your bagels.
What number settings do you use on your Bosch? Thanks!
Hi Elizabeth, I normally start out mixing just at a 1 then go up to a 2 as the dough starts to come together as I start adding additional flour. Then after it is all mixed well I will keep it at a 2 or maybe go up to a 3 to let it mix for the 6 minutes. Hope that helps.
I’m making these right now. So far so good! I knew as soon as I read “Costco bagels” and “bosch mixer” this would be the recipe for me. Those are two of my favourite things!
Update: they’re out of the oven and 100% perfect! Thanks for this recipe!
Thanks for your comment Natalie! Glad you loved them 😊. And I agree, Bosch Mixers and Costco bagels are two of my favorites too.